In this article we will see how to set up a system for automatic irrigation in the garden, which components make up the system, how many drippers we can use, how to make basic calculations, indicative prices and other useful information.
At the end, you will find useful tips drawn purely from experience.
What is the purpose of an automatic irrigation system?
The purpose of an automatic irrigation system is to water our plants at set times, for set intervals and with controlled amounts of water.
We usually install an automatic irrigation system when we cannot be present every time the plants need water.
In general it consists of:
- a water source (usually one or more taps)
- one or more irrigation programmers
- irrigation lines (pipes carrying water)
- a number of drips
An automatic irrigation system can be implemented in the garden, or on our balcony in the city.
Irrigation pipes/lines, automatic watering system
The pipes carry the water from the water source to our plants.
They are called “blind” because they have no holes.
On the market you will mainly find pipes of two cross-sections.
Pipes with a diameter of 16 mm (called F16) and pipes with a diameter of 20 mm (called F20). They are referred to as ‘Φ 16’ and ‘Φ 20’ respectively.
You will also find pipes with cross-sections Φ25, Φ32, Φ40, Φ50.
The name “Φ” is derived from the international symbol of the cross-section resembling the Greek letter Φ.
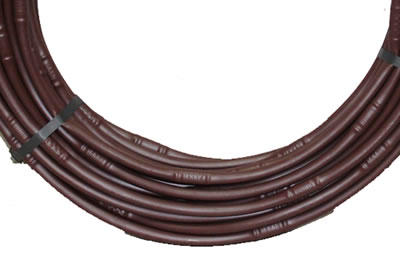
You will find pipes in black (they are the cheapest and most common) and in white or brown which are more expensive.
The irrigation pipes are sold in rolls of 100 meters. But you can also find retails (shorter lengths). Most agricultural stores can give you as many meters as you ask for.
The cost for the black pipe Φ16 is about 0,25 Euro/meter and 0,45 Euro for the white or brown ones.
The cost for the Φ20 pipe is about 0,33 Euro/meter.
Why are there pipes of different cross-section? What is the difference between them?
The water flow rate in the pipe depends on the cross-section of the pipe. That is, how much water it can carry per hour. The indicative flow rates depending on the pipe cross-section are:
- Φ16: 580 liters of water/hour or 0,58 cubic meters/hour
- Φ20: 1100 liters of water/hour or 1,10 cubic meters/hour
- Φ25: 1800 liters of water/hour or 1,80 cubic meters/hour
- Φ32: 3050 liters of water/hour or 3,05 cubic meters/hour
- Φ40: 5400 liters of water/hour or 5,4 cubic meters/hour
- Φ50: 8400 liters of water/hour or 8,40 cubic meters/hour
(The above flow rates have been calculated at 4atm pressure at the water source (tap).
The pressure of 4atm is the average pressure in the water supply network.)
Which pipe cross-section is suitable for me?
The answer relates to the flow rate that the water source (e.g. tap) can give you.
You can easily calculate the flow rate per hour that you have.
You will need a container whose volume you know and a timer (most mobile phones have a timer).
You turn on the tap and measure the time it takes to fill the container.
Let’s say you are using a container whose volume is 1.5 liters and it took 5.10 seconds to fill.
The flow rate from this tap per hour is: (3600 * 1.5)/5.10 = 1058 liters/hour or 1.05 cubic meters/hour.
In this case, using a Φ20 pipe makes the best use of the available water. (The Φ20 pipe can supply 1.10 cubic meters/hour).
But you can also use a Φ16 pipe, but knowing that of the 1.05 cubic meters/hour, you can actually use half of it. (The Φ16 pipe can deliver 0,58 cubic meters/hour).
If your garden has differences in elevation (i.e. it is not flat), you will notice that at low points the flow rate is higher than at those at higher elevations. So, in other parts of your site you will need to use Φ16 diameter pipes and in others pipes with larger diameters.

The usual practice for ιρριγατιον networks using more than 100 drip lines is for the main lines to use Φ20 diameter pipe (blue pipe in the drawing) and the lines carrying the drip lines to use Φ16 diameter pipe. In smaller networks, both the main lines and the lines with the drippers may use Φ16 diameter pipes.
Pipe connection fittings
It is common to need to branch irrigation pipes to reach all parts of your garden.
The water pipe you buy is a single piece, so you will need to cut it to the appropriate lengths and connect the pieces together.
In the market you will find connectors in shapes:
- rectilinear (called connectors)
- 90-degree angles (called angles)
- branches (called taf)
With these you can create all possible combinations.
Connection fittings are divided into two categories depending on the quality and stability of the connection:
- connecting plugs (low pressure networks)
- lock connection fittings (high pressure networks)
Connecting plugs (low pressure networks)
These connection fittings are used in low pressure networks. I use them in my garden, in combination with the Lock connection fittings shown below.
Straight connector

Used for connecting in a straight, sections of irrigation pipe. E.g. When we want to add an extension to a pipe.
The connection is made by pushing the pipes around both sides of the straight line.
Suitable for networks with relatively low pressure or many supplies. Indicative cost: 0.03 Euro/piece
Elbow connector
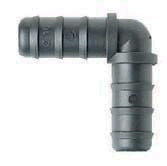
Elbow connectors are used for connection to corner pipes. The connection is made by pushing the pipes around the two sides of the corner. Suitable for networks with relatively low pressure or many supplies. Indicative cost: 0.10 Euro/piece.
Tee connector
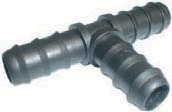
Tee connectors are used for branching pipes. The connection is made by pushing the pipes around the three sides of the taffrail. Suitable for networks with relatively low pressure or many supplies.
Indicative cost: 0.12 Euro/piece.
Stop connector
Stop connectors are used to tap the end of an irrigation line and terminate it.
Alternatively, for low pressure networks, you can crimp the end of the hose and tie it securely with wire.
Indicative cost: 0.30 Euro/piece
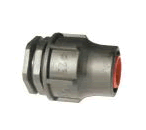
Claber Anti-Leak connectors
Claber anti-leak connectors are used for the same purpose as the previous fittings, i.e. to connect pipes. The difference is that they are used in high pressure networks and even in low pressure networks where we want to have ease and certainty in connecting the pipes.
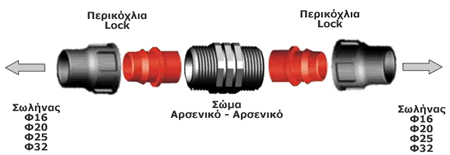
Image source: e-garden-shop.gr
The connection of the pipes is easily done by using pipe nuts.
It should be noted here that the color of the inner plugs changes depending on the cross-section of the pipe for which the connector is suitable. E.g. Green color is used for Φ16 pipes and red color for Φ20 pipes.
With the help of anti-leak connectors, we can connect pipes of different cross-sections. E.g. at one end we have a Φ16 pipe and at the other end a Φ20 pipe.
Straight Anti-Leak connector
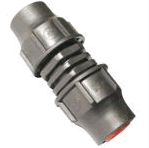
Straight Anti-Leak connector is used to connect in a straight line, sections of irrigation pipe. E.g. when we want to add an extension to a pipe.
Indicative cost: 0.50 Euro/piece
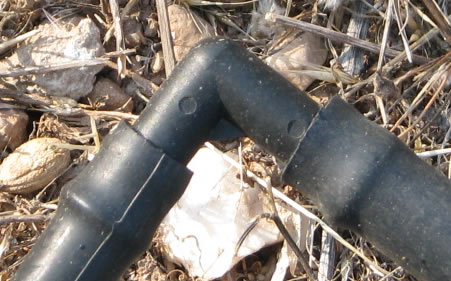
Elbow Anti-Leak connector
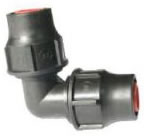
Elbow Anti-Leak connector is used to connect to a corner of a pipe.
Indicative cost: 0.65 Euro/piece.
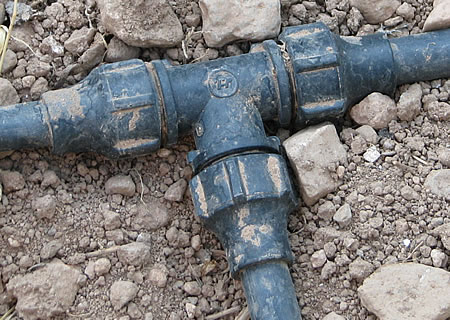
Tee Anti-Leak connector
Tee Anti-Leak connector is used for branching pipes. The connection is made by pushing the pipes around the three sides of the tee. Suitable for irrigation networks with relatively low pressure or many supplies. Indicative cost: 0.12 Euro/piece.
Stop Anti-Leak connector
Used to tap the end of an irrigation line and terminate it.
Alternatively, for low pressure networks, you can crimp the end of the hose and tie it securely with wire.
Indicative cost: EUR 0.30 per piece.
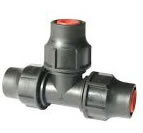
Anti-Leak Flow Control Valves
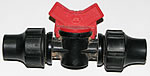
Valves are used to stop the flow of water in parts of the irrigation system. But they also have another use. With their help you can control the flow of water flow in parts of the irrigation system, depending on how open you have them.
In my opinion, valves are an essential component in an irrigation system.
Indicative cost: 1.10 Euro/piece.
Drip Points
The drip points are the parts from which the water that irrigates our plants comes out.
As shown in the image below, we have basically 4 options.
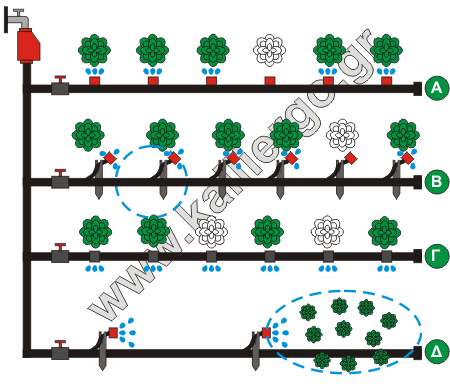
Line A uses single outlet drippers nailed onto a blind tube.
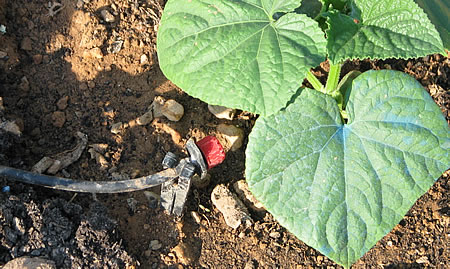
Line B uses single outlet drippers mounted on the end of Φ6 irrigation pipes. The drippers are supported by support stakes so that they do not touch the ground.
Line C uses a micro drip pipe. A micro drip pipe has integrated drippers at specific distances.
Line D uses micro spray jets mounted on the end of Φ6 irrigation pipes. The sprays, jets water to entire areas and not individual plants. They are usually used for watering carrots, beetroots or lawns.
Drippers
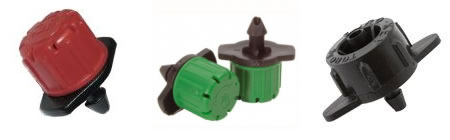
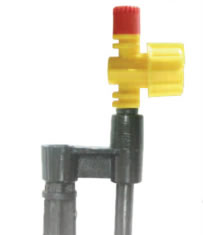
Irrigation using drippers allows controlled water to flow out in the form of drops. On the market you will find various models which vary in the volume of water they can supply per hour. So we have models that can give 0-70 lt/hour, others that give 0-100 lt/hour and others that give 0-150 lt/hour.
The top part of the drippers (the green and red part in the photo), can be screwed and unscrewed, thus regulating the amount of water coming out of the dripper.
Although we call them drippers, don’t imagine the water coming out of them as slowly and torturously falling drops. They can be adjusted to put out a lot or a little water.
If the pressure is high enough you can see them spouting water like little fountains in a radial pattern.
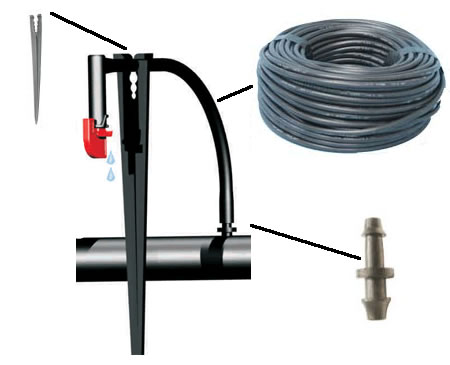
The drippers are either nailed onto a blind tube at the points we want (where we have put our plants), or to the end of a thin tube which you in turn nail to the blind tube. To nail the tube to the blind pipe, we’ll need a drill bit to drill it and a water intake connector. This solution gives us a lot of freedom. We can shift the dripper and place it exactly where we want it. The dripper rests on a support stake so that it does not touch the ground and clog up.
Indicative cost of the drip tray.
Indicative cost of irrigation pipe Φ6: 0.20 Euro/meter.
Indicative cost of support stake: 0.05 Euro/piece.
Indicative cost of water intake connector: 0.03 Euro/piece.
Indicative cost of a groove 2.60 Euro/piece (you only need one).
Micro Spray Jets
Micro Spray Jets are used for watering in the form of a spray. There are various models on the market, smaller or larger. You should pay attention to two things. The angle at which they jet the water (there are sprinklers that spray water in a 180 degree area and others in a 360 degree area) and the ability to control the intensity of the watering.
Indicative cost: EUR 0.65 per piece.
Micro Drip Pipe
The micro drip pipe is very similar to a blind pipe. But there is one big difference. It has built-in drippers from which the water comes out. The drippers are inside the tube. They can be seen as little bumps.
The characteristics that micro drip pipes have are:
- the flow rate in liters per hour per dripper (2lt/hour or 4lt/hour)
- the spacing of the drippers (20, 25, 30, 30, 33, 40, 50, 60, 100 cm)
The usual distance between the drippers is 33 cm.
The flow rate is from 2 or 4 litres per hour per dripper.
The micro drip pipes are suitable for watering greens or flower beds with ornamental plants. I can tell you from experience that they are not suitable for the vegetable garden.
They are not suitable for the vegetable garden for four reasons:
- Their drips often clog up as they come into direct contact with the soil
- They continue to water the places where the drippers are located even if there is no plant there (e.g. it has dried up or you have removed it)
- They have a low flow rate
- It is not possible to control the amount of water coming out of the drippers.
Indicative cost: 0.28 Euro/metre.
Water Timers
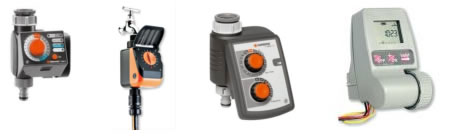
Water Timers are a fundamental part of an automatic irrigation system. With the help of water timers we can control when and for how long we water our plants.
Water Timers are autonomous devices powered by batteries or electricity. Here we will deal with battery-powered models.
They are mounted on the taps. After they are installed, we turn on the tap. No water will run, except for the time and interval we have set. The water through the watering pipes will reach our plants and water them.
On the market you will find a wide variety of models of Water Timers.
They cost from 35 Euro to 130 Euro. Be careful, because here too the saying “you get what you pay for” applies. The cheapest is not always a smart purchase.
Practical tips for choosing a water timer
Programming possibilities
In cheaper water timers the user does not have many options. He can only choose between preset programs of duration and watering period. He will soon understand that this is very limiting. The default irrigation schedules do not meet the needs, especially for the hot periods when the plants have the greatest needs.
I would suggest you choose a water timer that you can set:
- the duration of watering (how many minutes the plants will be watered for, e.g. 1 minute, 5 minutes, 20 minutes)
- the day(s) of the week that the watering will take place (e.g. every day, only Monday and Thursday) (e.g. minutes, minutes, minutes, minutes, minutes, minutes, minutes, minutes, minutes, minutes, minutes, minutes, minutes, minutes, minutes, minutes, minutes)
- the period of watering (e.g. every 24 hours, every 12 hours, every 4 hours, etc.)
With these parameters at your disposal, you can, for example, specify that you want your plants to be irrigated every day, for 5 minutes, twice a day.
A simple market research will reveal that for only a few Euros more than a cheap water timer, you can find water timers with more features.
Scalability
Some water timers can accept rain sensors. A rain detector is a simple device that can detect whether it has rained or not.
In case it has rained, it instructs the timer not to irrigate. If you need this feature, it is advisable to choose a water timer that can meet your needs.
Parts and Service
Water timers are machines and machines break down. So choose a water timer based on both support and the ability to find spare parts.
Quality of construction
Construction quality ensures two things:
- the long life of the water timer
- the reliability of the water timer
Do not forget that when a water timer is used, your tap is on. The only thing that stops the water from running uncontrollably is the electro valve inside the timer.
A failure of the hardware can cause the water to run for days or weeks, the time you are away. It is easy to understand what the consequences of this will be for your pocket (water bill) and your plants (destruction).
Tips for designing the irrigation lines in an automatic irrigation system
Maximum lengths of irrigation pipes
For an automatic irrigation system to be effective and to be able to carry enough water without problems, you need to make sure that the lengths of the pipes do not exceed certain limits.
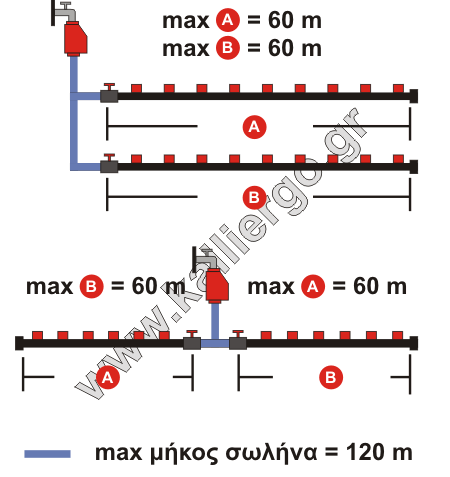
In the above diagram, two types of pipes are distinguished.
The blue pipe is the one that connects the watering programmer to the pipes carrying the drippers. The blue pipe may have a cross-section of Φ20 or Φ16.
The total maximum length of this pipe shall not exceed 120 meters.
The black pipe is the one carrying the drippers and has a cross-section of Φ16. There may be more than one line of pipes with drippers. This is in fact the most common case. The length of each black pipe must not exceed 60 meters.
How many drippers can I use in an automatic irrigation system?
The answer makes sense for each independent automatic irrigation system that we install. We may well have more than one.
To answer this question we need to know the following:
- the flow rate in liters per hour that the tap we are connecting to can give us
- the water timer
- the water pressure in the tap
- the flow capacity of our drippers
At the beginning of this article, we described an easy way to calculate the flow rate in liters.
You can measure the pressure at the tap with a pressure gauge that you screw onto the tap. You can find it in plumbing shops.
The flow capacity of the drip traps can be found in their specifications. Drippers for example, depending on their type, are set for a flow rate of 0-150 liters per hour.
Example 1
In the following example, we assume that:
- the water pressure is the typical pressure promised by EYDAP, i.e. 3 bar or 3 atm
- the flow rate is 1050 liters per hour
- our drippers are set at 25 liters/hour (2 liters per 5 minutes of watering)
How many drippers can we use?
In theory, you can use 1050/25 = 42 drippers
In reality, you should use even fewer.
Why?
Because the flow rate you measured and the pressure are not guaranteed and stable.
Also the dynamic pressure drops along the pipe as the water exits the first drippers. The dynamic pressure in the last drippers is lower than in the first drippers.
Empirically a safe number is 80% of what you calculated, i.e. 42 drippers * 0.80 = 34 drippers.
So you can water 34 plants from this automatic irrigation network.
If you have more plants, you will need to install more than one automatic watering system.
Example 2
In the following example, we assume that:
- the water pressure is the standard pressure promised by the EYDAP, i.e. 3 bar or 3 atm
- the flow rate is 1050 liters per hour
- our drippers are set at 12 liters/hour (1 liter every 5 minutes of watering)
How many drippers can we use?
In theory, you can use 1050/12 = 87 drippers
In reality, you should use even fewer.
Why?
Because the flow rate you measured and the pressure are not guaranteed and stable.
Also the dynamic pressure drops along the pipe as the water exits the first drippers. The dynamic pressure in the last drippers is lower than in the first drippers. Empirically a safe number is 80% of what you calculated, i.e. 87 drippers * 0.80 = 70 drippers.
So you can water 70 plants from this automatic watering network.
If you have more plants, you will need to install more than one automatic watering system.
Example 3 with drip tube
In the following example, we assume that:
- the water pressure is the typical pressure promised by the EDP, i.e. 3 bar or 3 atm
- the flow rate is 1050 liters per hour
- the drip tube has built-in drippers that supply 4 liters of water/hour and the drippers are 33 cm apart
How many meters of drip pipe can we use?
First we will calculate the number of drippers.
This is 1050/4 = 263.
We make the reduction for safety reasons: 263 * 0,80 = 210
Each meter of drip pipe carries 3 drippers.
So to calculate the meters, we divide 210 by 3.
210/3 =70.
So we can use up to 70 meters of this drip pipe.
What is the shortest appropriate distance between the drippers?
The shortest appropriate distance between drippers (I am not referring to drip tubes where the distances are given) is 45 cm.
For how long should I water with an automatic irrigation system?
This depends on how many liters of water/hour come out of the drippers and how many liters of water you want to water your plants with.
To work out how many liters of water to water each of your plants, use the following formula:
Water Volume (in Litres) = [Watering Time] * [Watering Supply in litres/hour] / 60
To calculate how long it will take to give your plant the liters of water you want, use the following formula:
Watering Time (in minutes) = [Litres of Water] * 60 / [Supply in litres/hour]
Example 1
Our drippers are set to provide 30 liters/hour. I water for 5 minutes. How much water will reach the plant?
In 5 minutes (5*30/60) each plant will be watered with 2.5 liters of water.
Example 2
How long do I need to water to give the plant 3 liters of water, when I have set the drippers at 12 liters/hour.
You will need to water for 15 minutes (3*60/12).
When should I irrigate?
The best times to irrigate in summer are the early morning hours (from 04:00 to 09:00).
- In the early morning hours, the water pressure in the network and the water supply are higher than at other times because there is no water use from other consumers.
- The water does not evaporate from the heat and reaches deeper into the roots of the plants.
- The temperature of the water in the pipes is much lower than in the morning, when the water is actually burning.
In the other months the range of watering times is wider (from 05:00 to 12:00). The temperatures are lower. There is less risk of evaporation and no risk of high water temperatures.
Layout tips
Put identical plants in the same irrigation line. E.g. only tomatoes or only peppers. This way, you can control the water they need more easily.
Always use taps to connect the main lines to the irrigation lines. With the valves, you can close off an irrigation line (e.g. you have taken out all the potatoes and no longer need to water that part). With the taps you can control the flow of water, depending on how much you have it closed or open.
Use drippers rather than drip tubes. Drippers can be turned off when there is no more plant to water. Drippers don’t clog as easily.
Do not nail the drippers to the pipe. Connect the dripper to the irrigation pipe with a hose. Place the dripper on a lance so that it does not come into contact with the ground. This arrangement gives you a lot of freedom because you can bring the dripper exactly where you want it, close to the plant.
Use more than one automatic watering system if you have many plants. You will have better control and better yield.
If you have more than one automatic watering system, don’t have them all watering at the same time.
Epilogue
The above tips are empirical and I hope you find them useful
They do not describe all possible layouts or capabilities of an automatic irrigation system.
They are concentrated for use in vegetable gardens.
This article on automatic irrigation is dedicated to those who are just starting out in the magical world of growing. It was prompted by the recollection of my first steps. Back when I knew nothing and everything was new and unknown.
Tags: AUTOMATIC WATERING SYSTEM • DIY • DRIPPER PIPE • DRIPPERS • GARDEN • KITCHEN GARDEN • TIPS